Using Google Analytics To Improve PPC Performance for Your Online Store

It’s 2020! A new year chock-full of opportunities to improve the performance of your ecommerce business and take it to entirely new heights. My only question is: Are you brave enough to dive in head-first?
You may have not even known that 2019 was a pivotal year for ecommerce businesses that were using or just getting started out with their PPC (pay-per-click) search engine marketing efforts, what with search giant Google’s mass strides in adapting more Machine Learning with Smart Shopping campaigns and Bing Ads officially rebranding to Microsoft Advertising.
I mean, Google alone made over 10 impactful changes and enhancements to products like Google Ads and Merchant Center just in 2019 alone. (Note: In years prior they averaged only about half that number per year with many being “under-the-radar” updates).
However, with each new year comes new opportunities to do better than those prior. Many merchants will reflect back on previous performance by relying solely on the respective advertising platform (ie Google Ads) reports and metrics alone. This is a relatively commonplace practice among small to medium-sized ecommerce businesses especially, and mainly due to:
- A lack of refined knowledge of the subject matter
- Fewer resources or less staff to support using other tools
- Fear of overcomplicating things with MORE data
- Just NOT HAVING ENOUGH TIME!
Herein lies that proverbial “shot in the foot” though: By ignoring other tools (even free ones), merchants are losing out on vital data, funnelization insight, and opportunities to improve upon both the performance highs and shortcomings of each prior time period – whether that be 2 weeks or 2 years.
By far and long, there is no better (and free) tool available in your kit than Google Analytics.
For some of you, I’m sure I felt a bit of a shudder at the pure mention of the name, but another kind of fear: FOMO – Fear of Missing Out SHOULD outweigh your phobia.
My sincerest hope is that I can dispel that inherent fear because Google Analytics is a crucial (albeit often misunderstood) part of your arsenal, and one that can and will have an incredible impact on helping you to improve your PPC campaign performance for your online store when used properly.
The Big “Duh!” – Your UA Tracking Code
I can certainly forgive those of you who may not be ready for the deep dive into Google Analytics, but there is absolutely no excuse for NOT having a Google Analytics account and especially NOT having it set up properly.
Well, maybe I CAN forgive a scopophobic but let us try and be real here, okay? Getting your GA account set up is pretty straightforward, and if you are truly just getting started then you can head over to the Google Marketing Platform to begin.
Let us fast-forward a bit to the meat of our topic here: your Universal Analytics Tracking Code. This is it! Just one little snippet of code that Google creates for you and all you have to do is implement on your website.
I mean this thing is the Swiss Army Knife of data collection – it slices, it dices, it segments – and understanding your shopper behavior with this data only makes you a better “marketer”. The data and metrics consumed and reported by this code are key players in powering you up to improve PPC campaign performance.
Now, every ecommerce store is different, governed especially now so by which ecommerce platform you have built your website on. SaaS ecommerce leaders like BigCommerce make it very easy to get this code implemented to start tracking all shopper behavior with a clean backend control panel where you can simply copy, paste, and save the code snippet into a specific field – the platform does the rest by making sure the code is placed in the correct spot in your source code.
This is not the only way though. Google’s Tag Manager is a personal favorite of mine – a tool that allows you to implement multiple snippets of code from varying sources all in a single “container”.
It can, quite easily I might add, get very messy when attempting to add multiple snippets throughout your website’s source code and Google Tag Manager is an excellent solution for anyone who employs an omnichannel marketing strategy such as when using other advertising platforms like Facebook Ads and Microsoft Advertising because each (even Google still) has their own unique set of tracking codes.
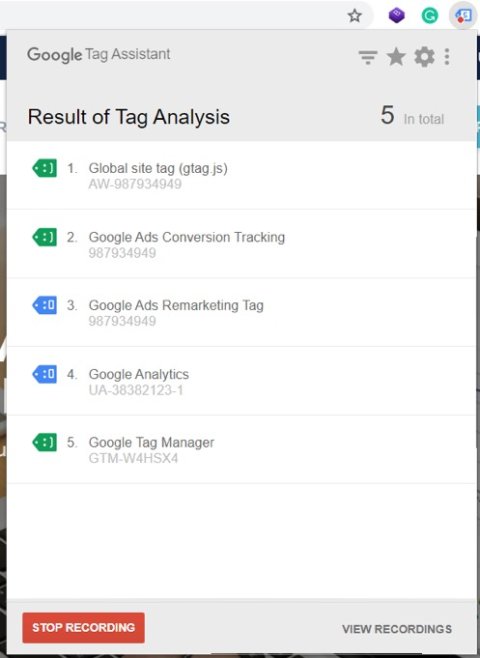
Pro Tip: Google’s Tag Assistant, a free browser extension, can be used to record and check the status of your various tracking codes – including Google Analytics. If a code happens to be failing or improperly implemented, this tool can help you to address any issues.
While getting your UA Tracking Code implemented and ensuring that it is firing correctly may be the first step, there are a few other important settings to be aware of within Google Analytics, especially for ecommerce business owners:
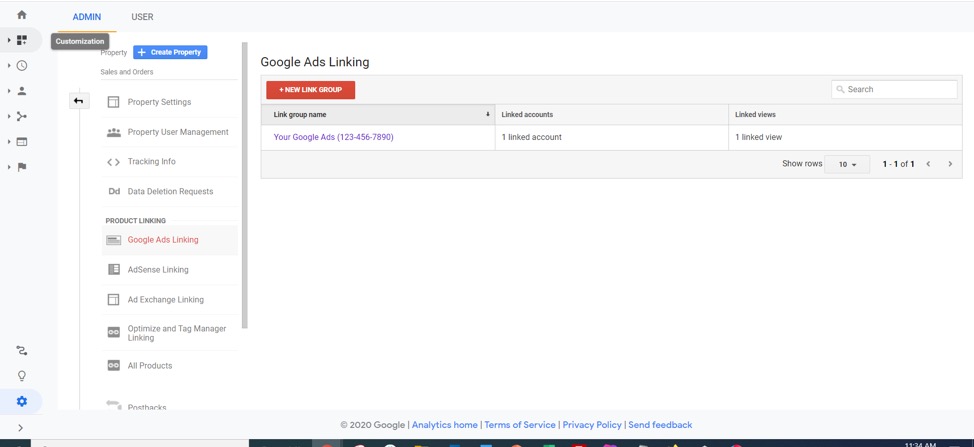
Linking Your Google Ads Account
Seems obvious, no? Connecting Google Analytics with Google Ads is a clear no-brainer. It allows you to import Analytics-based conversion goals when logged into your Google Ads account.
Navigate to Admin > Property > Google Ads Linking and get this squared away.
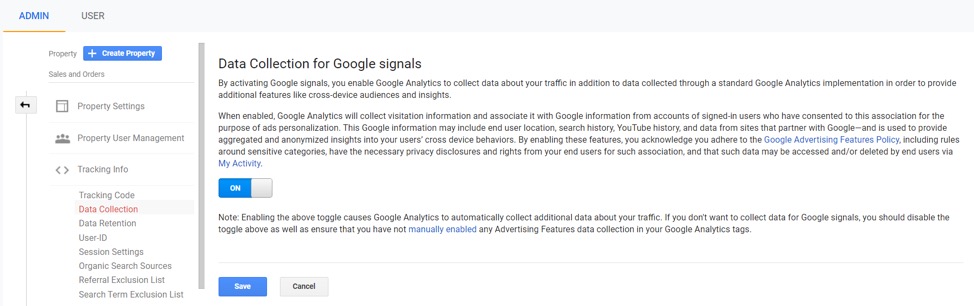
Data Collection & Data Retention
Also found in Property settings under Tracking Info, these settings are incredibly important and their naming pretty much sums it all up.
Data Collection now uses Google signals and allows Analytics to collect additional data about your visitors outside of the standardized data when it is not enabled. ENABLE THIS!
Data Retention (relatively new and not as important), can be used to govern the amount of time before user-level and event-level data is automatically deleted from Analytics’ servers.
DON’T FORGET! Every business out there that collects personal information about their customers must be aware of the current laws governing data protection, privacy, and the “right to be forgotten.” More specifically, business owners must take steps to ensure that their companies are in compliance with both the General Data Protection Regulation (GDPR) in the EU and, as now enforced as of January 1st 2020, the California Consumer Privacy Act (CCPA).
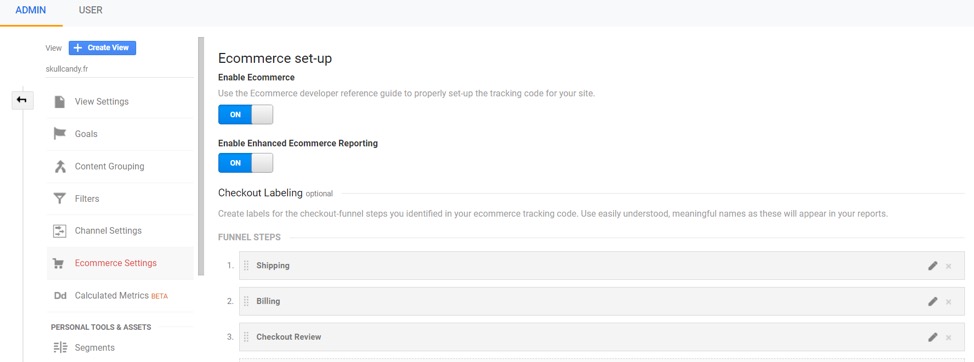
Ecommerce Settings
Well, OBVIOUSLY we want to enable this. Ecommerce Settings allows Google Analytics to begin tracking vital metrics such as cart-level shopper behavior. By default, it will also produce the Transactions Conversion Goal which would then be imported within Google Ads.
Enhanced Ecommerce Settings only further improves the depth of data collected, with the optional step of also tagging your checkout-funnel steps.
You can locate these within Admin > View > Ecommerce Settings.
Transactions Conversion Goal in Google Ads
I wanted to throw this one just for extra measure – and because it is a step NOT to be skipped. Without this you will not be able to connect the dots between conversions from Google Ads campaigns and transactional data in Google Analytics.
While Google Ads Conversion Tracking can also be used, the vast majority of ecommerce business owners will see more accurate conversion value (revenue) reported by the Transactions conversion goal that can only be imported from Google Analytics.
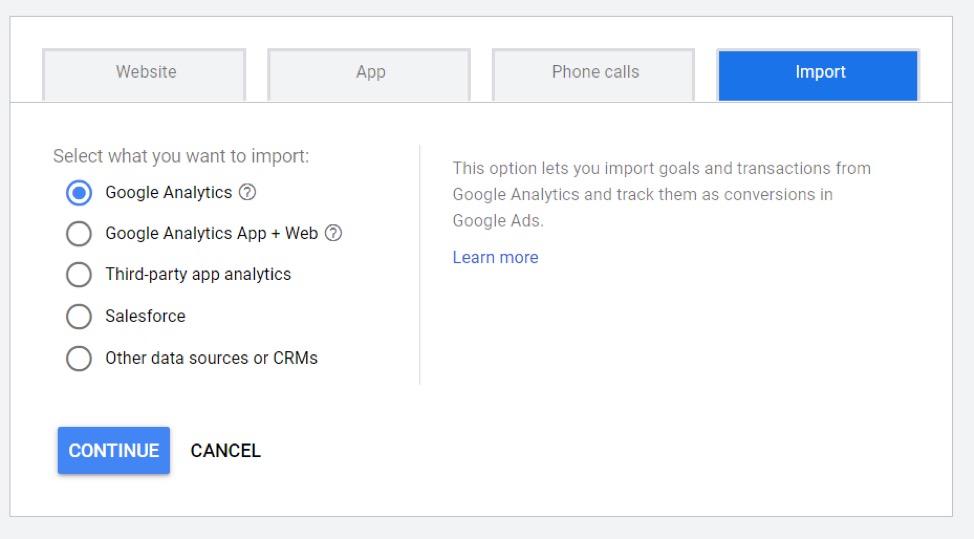
In Google Ads navigate to Tools & settings (wrench icon) > Measurement > Conversions. After choosing to add a new Conversion goal, select Import > Google Analytics and then continue on with the steps outlined:
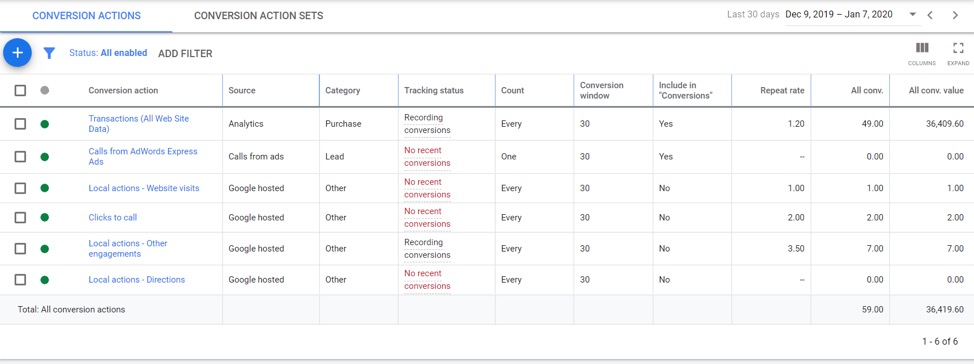
Not necessarily your typical implementation, but below you can see what that particular goal would then look like afterwards in the Google Ads interface:
All in all, this should get you off to quite a good head start. Now, if you happen to already be up and running, maybe this spurred you on to perform a quick or even in-depth health check of your Google Analytics account, settings, and conversion actions – and if you found any issues lurking about, maybe this was the catalyst in getting them fixed.
While reports, data, metrics, charts, and all that jazz are all great tools in themselves, there is still so much more that you can accomplish with Google Analytics.
In fact, my next topic is not only a super-mega-powerful PPC performance asset, but it is something you can implement immediately, customize to your heart’s content, and optimize with over time.
I’m talking about Remarketing Audiences.
The Ultimate Win Back – Remarketing
If you yourself have ever wondered how companies seem to be able to “chase you around the internet” with their ads, then you have first-hand experience with Remarketing (also sometimes referred to as Retargeting).
Remarketing is the practice by which companies, such as ecommerce stores, first collect visitor behavior and demographics using tools like Google Analytics, and then use that collected data to build advertising campaigns that explicitly target and re-deliver ads to said previous visitors.
The top two PPC advertising channels for Remarketing/Retargeting are Google Ads and Facebook Ads.
Note From Me: We’re not delving into Facebook today, but that’s mostly because Facebook has its own way of Retargeting that doesn’t require Google Analytics at all – thus making it a moot point as it relates to the theme of our discussion here.
Google Ads, however, can work in tandem with Google Analytics to help you target the right previous shoppers, at the right times, for the right reasons – and drive up return on ad spend and sales by a substantial rate. In fact, in a study we performed in 2017 when RLSA (Remarketing Lists for Search Ads) was just getting started we noted some incredible results:

What’s more is that Google Ads, among its seemingly infinite number of glorious tools, allows merchants and marketers to split advertising campaigns into two distinct categories which both utilize remarketing in one way or another:
- Remarketing-Only: Certain campaign types such as Dynamic Remarketing serve the singular purpose of targeting and delivering ads to previous website visitors. Dynamic Remarketing takes this concept a little bit further for ecommerce businesses as it utilizes their product feed to deliver product-style display ads based on what products a previous shopper had actually viewed, purchased, or even abandoned prior to leaving the storefront.
- Audiences: Whether it be Search (Text), Display, Video, or Shopping, retailers can “attach” audiences to campaigns that allow for ads to be delivered not only to the general target market, but to previous visitors based on the criteria you set for each audience. For example, if you have a Shopping campaign that targets the entire United States, that same campaign with an attached audience for “Cart Abandoners” will simultaneously re-deliver ads to that segment as well.
Pro Tip: Gotcha! Technically speaking, any campaign can be made to be “remarketing-only” by way of using Google Ads Targeting settings for Audiences – of which there are two: Targeting and Observation. When using the Targeting setting, this isolates your ad delivery only to the Audiences you have applied. Observation does both by including the general audience AND previous visitors (based on the audience criteria).
As you can probably tell, so far at least, we have quite a bit of ground to cover – and you are probably wondering where Google Analytics actually comes into play here.
Well, just as Google Analytics collects the data we need to run Remarketing campaigns in Google Ads, so too can it be used to build Remarketing Audiences.
Google Analytics Audience Definitions
Over the years working with ecommerce businesses, our team has been able to isolate 4 key remarketing audiences that every merchant should attach to their ad campaigns, and especially their Shopping ads campaigns.
Do note that I’m prefacing with skipping the All Visitors audience because Google Ads actually builds this segment automatically, thus we can ignore that for now since we don’t need to build it using Google Analytics.
The other three audiences are as follows:
- Cart Abandoners: Those who have left their shopping cart full of product, but left and never came back to move to checkout
- Checkout Abandoners: A slight jump down the funnel from the Cart, but still those who abandoned and never came back to finalize the purchase
- Bounced Visitors: By this we really mean 100% bounce rate, or someone who reaches your site and leaves almost instantly
All of these can be built using Audience Definitions and the Audience Builder in Google Analytics found in Admin > Property Settings.
Creating each audience starts out exactly the same:
- Select + New Audience
- Click Create New
- Now in Audience Builder, locate Advanced > Conditions
Each audience’s criteria is where things can begin to get a bit tricky, but inherently not all too difficult to figure out. Feel free to check out this guide which will walk you through building out the Cart and Checkout Abandoners Audiences.
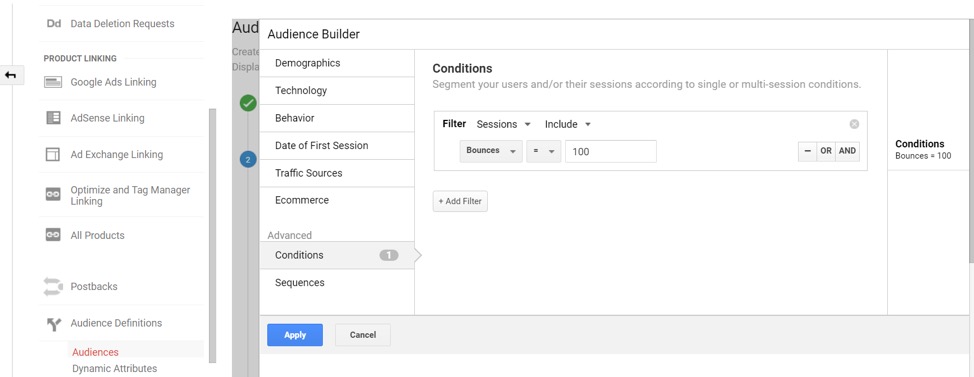
In the above screenshot you can see the criteria for Bounced Visitors wherein I have set the Conditions Filter for Sessions > Include > Bounces = 100 – at which point I can now click Apply.
Pro Tip: You can also consider setting the Filter to Bounces ≥ 90 which is also indicative of a high bounce rate, but you want to be a bit more careful of this as an ecommerce business. Even a 90% bounce rate can wind up excluding people who did make a purchase in the past which might actually be a quality remarketing audience.
Next, though, I need to set my Membership duration or the length of time between 1 and 540 days (30 days being the default and definitely a good place to start) that I want my site visitors to remain collected in this Audience and therefore considered when my ad campaigns in Google remarket to them. In the same step, we’ll also name our new Audience before continuing on.
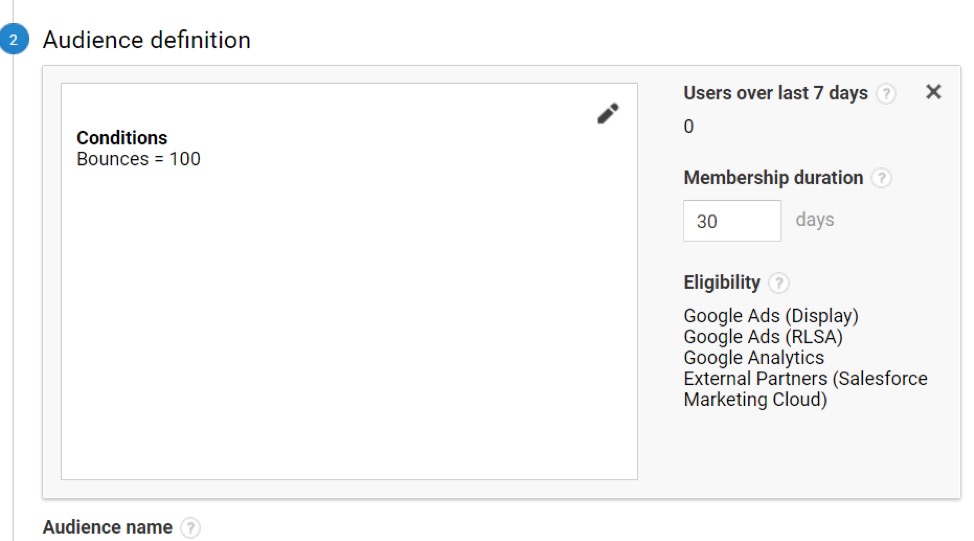
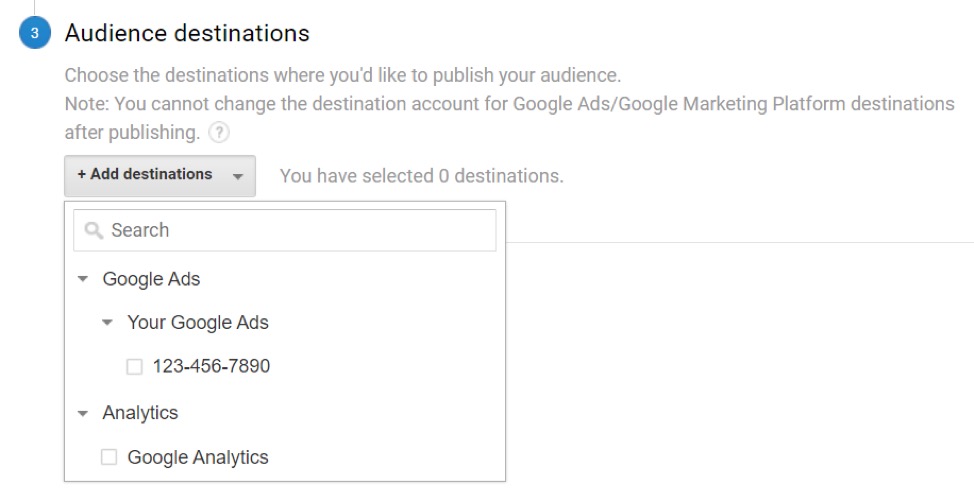
Finally, we select the Destination (ie your Google Ads account) and then Publish the Audience to it.
Excellent! Now, we just need to attach this Audience to a campaign in Google Ads.
Adding an Audience in Google Ads
This is assuming that you have campaigns already created or running in Google Ads.
The Google Ads UI makes it very easy to add our new Audience to any campaign OR ad group we want.
That is an important thing to note too: You can set an Audience to encompass the entire campaign or set audiences unique to eachad group. This can be especially helpful in Search Campaigns where you might have structured your ad groups based on specific keywords and maybe even landing pages. Thus, setting ad group-unique audiences allows you to control the retargeted visitors based on that particular criteria as well.
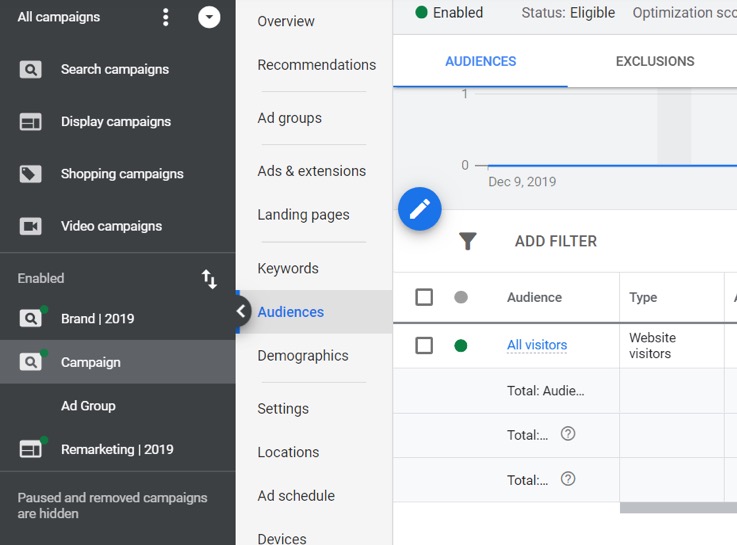
For the sake of this guide, we are going to be adding our newly created Bounced Visitors Audience to an entire campaign. While in Google Ads, locate and click on the campaign you wish to edit and then click on Audiences:
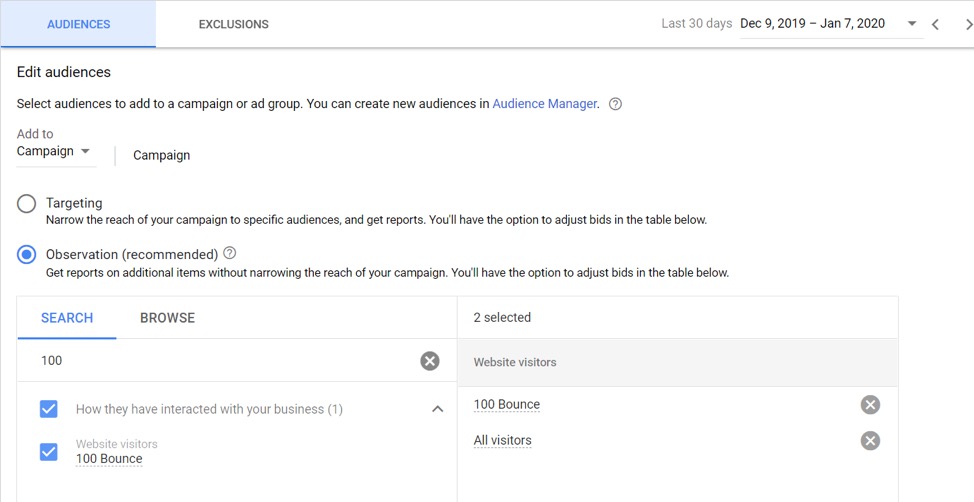
Now, click the blue edit icon (looks like a pencil) to open the Edit audiences menu. Seen below, we are adding this to the campaign (not the ad group), opting for Observation as our Targeting setting, and using the Search function we can locate and select the Audience we just built in Google Analytics – assuming you remember the name:
Once you are satisfied with your selection, just click SAVE at the bottom of this editing menu and your Audience will be added to the campaign.
Let’s take a quick pause here for a little FAQ.
What does this actually do?
If we use the example of, let’s say, a Shopping campaign, attaching an Audience to the campaign does NOT cause ads to follow people around the internet.
That is Display remarketing.
What it does do, however, is that when someone interacts with our ad(s), visits our storefront, leaves (thus being captured by Google Analytics), then performs another search on Google again – our ad(s) are likely to show AGAIN as a result.
Why “Observation”?
The Observation setting ensures that this campaign will run according to both its primary targeting settings (ie Location, Device, etc.) and also simultaneously remarket to previous searchers who interacted with our ad(s).
Targeting as a setting forces this campaign to ONLY target our attached audience and ignores the general targeting settings. This would be the setting I would use when I set up a remarketing-only campaign.
In this case, I don’t want a “remarketing-only” campaign – but I do want a campaign that can deliver ads to both the general population (based on the campaign targeting settings) AND my remarketing audience as well.
What about Bid Adjustments?
Since I paused before mentioning them, anyone with some experience in Google Ads may have stopped here and wondered about Bid Adjustments, however for you unseasoned folks out there you may not even know what they are.
In Google Ads, Bid Adjustments allow you to set a broad percentage multiplier that either increases or decreases your Max CPC bids across an entire campaign or ad group based on a particular segment, like an Audience.
Bid Adjustments can also be used to alter bids for such segments as Devices and Locations as well. Now, why would we want to do this? Well, it’s all about understanding intent and value in each segment.
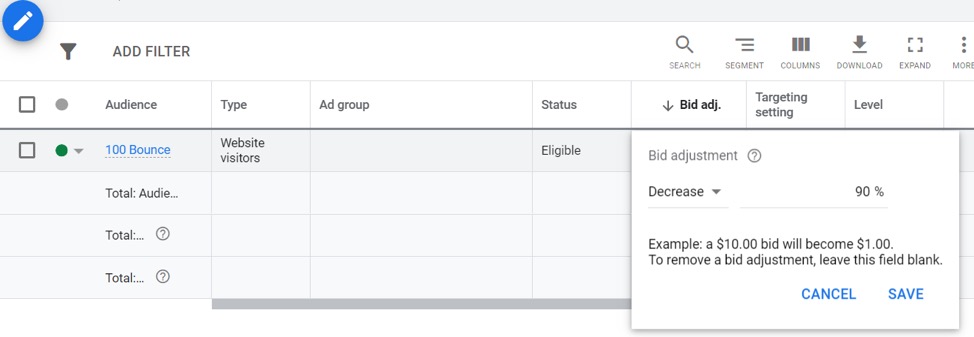
In our example using Bounced Visitors we can make certain assumptions about the intent and value of the shopper because they visited our website but left almost instantly. By that we can assume that this audience is most likely made up of low value shoppers with little to no intent to purchase.
Hence, for such an audience we lower the bid by as much as 90% so that while there is still opportunity to win back some of them, the majority we do not spend as much on to try and attract again.
Conversely, if we were to use the Cart Abandoners audience, this segment more than likely represents higher value shoppers with a distinct intent to purchase. They may have, for example, simply forgotten to checkout and finalize their purchase.
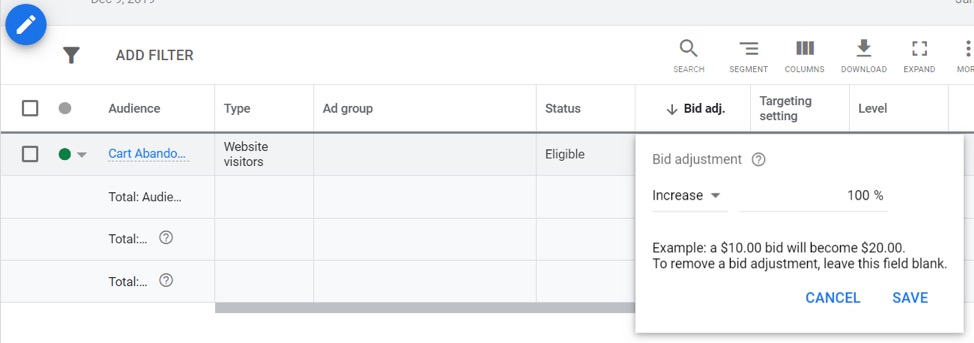
In this case, we are increasing our bids by as much as 100% because we want to hyper-target this segment in an effort to attract the high value Audience and entice them to return and complete their purchase.
In the end, whatever Audience you are using, it is important to always measure intent and value and then make decisions about your Bid Adjustments accordingly.
As a general rule though:
- Low Value, Low Intent = Decrease
- High Value. High Intent = Increase
What’s Next? Measure, Optimize, Grow
We have covered quite a bit of ground in our time together, and you should now have a great head start into using your Google Analytics to drive greater results for your PPC advertising campaigns.
At the same time, however, you aren’t done! The best advice I can give now that you are set up is to wait!
As with any practice in PPC, namely Google Ads, we need to give our campaigns time to collect valuable data and generate some results. The more data we have, the more refined we can become in our ongoing optimizations. I typically recommend allowing for between 30-60 days initially before making any changes to your Remarketing Audiences alone.
Those who may not be as familiar with either PPC or Google Ads Remarketing in general should look to certain metrics over time to gauge performance such as:
- Click Through Rate: How often people clicked on your ads compared to how many times your ads were seen. Helpful in determining if your ads are “attractive” enough in their offer.
- Conversion Rate: How often people completed an action or made a purchase compared to how many times your ads were clicked on. Can help you better understand on-site performance after people have already arrived.
- Cost / Conversion: How much you spent on average per action or purchase made after clicks on your ads. A high cost to convert may be a good reason to lower your bid adjustment.
- Conv. Value / Cost (ROAS): Return on Ad Spend is an X multiplier value that indicates how much you earned in revenue compared to how much it cost you to generate said revenue. A lower ROAS can be a key indicator of loss, especially for an ecommerce business. When factoring in your native Cost of Goods Sold (COGS) + Ad Spend, a low ROAS can mean you are not making any money or you are actually losing money on those sales.
While these metrics are best to be analyzed directly in Google Ads, you can still use Google Analytics Ecommerce reports to get even deeper into your performance.
Google Analytics becomes an even more important tool with Display type or Dynamic Remarketing PPC campaigns because you can drill down to key performance layers that Google Ads cannot such as Transactions, Average Order Value, and even metrics on Tax and Shipping.
As you go off on your journey, my sincerest hope is that I was able to teach you something that can help you grow and succeed with your PPC campaigns.
Don’t be afraid to test different things, be brave, be bold. Focus on a data-driven approach because it is only in data that we can see the big picture at the end.
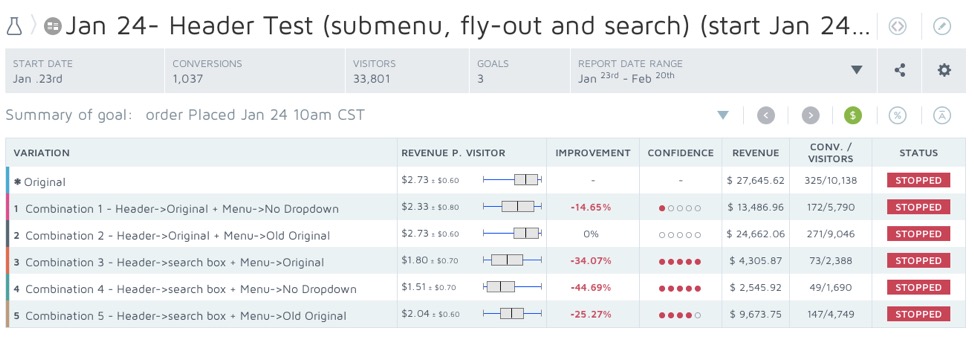
Convert Experiences seamlessly integrates with Google Analytics, so you can set up complex tests and gather valuable insights about how your experiments are performing on different segments of users.
A popular feature is the Google Analytics E-commerce Revenue Tracking which gives you advanced data on RPV (revenue per visitor), conversion rates, order items per variation and more.
Sign up for a free trial for Convert Experiences and check it out for yourself.